In June 2013, I presented about modular jQuery plugins at the jQuery Portland 2013 conference. You can watch my entire presentation video and/or check out my full slide deck, but let’s review my talk.
What Does Modular Mean to You?
The term “modular” has many different definitions in the JavaScript community. In the context of this blog post, let’s establish it as JavaScript logic that is separated from the rest of a codebase, can work independently, and does one thing and does it well.
Why Modular?
Maintainability. It is far easier for developers to understand code that has a limited scope.
Benefits of a Maintainable Codebase
New Contributors - A modular codebase allows new contributors to make improvements/changes straight away, since knowledge of an entire codebase is not required.
Core Maintainer - Looking at code you wrote over three months ago might as well have been written by someone else. You will experience the same learning curve improvement that new contributors experience.
Code Reuse - When different parts of an application are separated into standalone modules, it is easier to plugin and play each part wherever you need it. This drastically decreases the amount of code and code duplication in a codebase. Less bytes = happier developers.
Physical and Emotional Well-Being - Wading through one monolithic file is difficult on the eyes and brain. Looking at logically-grouped small files is not.
jQuery Plugins
Now that we have covered the benefits of a modular codebase, let’s take a high-level look at a typical jQuery plugin codebase.
Let’s assume this is a jQuery Tooltip plugin that has been written in one file:
1 2 3 4 5 6 7 8 9 10 11 12 | |
For very small plugins, this code structure will work at first. Unfortunately, one of the most common problems in software development, feature creep, will demonstrate that this architecture is not scalable.
As more features are added to a plugin and the codebase grows, it becomes more difficult to maintain.
How to Become Modular?
AMD (e.g. Require.js) and CommonJS (e.g. Node.js) are the two most commonly used module formats that allow you to separate your codebase into small reusable pieces. If you aren’t using a specific module format, then you need to be aware of inner-file dependencies when separating logic into different files and then bringing them together at build time.
Can I use AMD with my jQuery Plugin?
Yes! You can wrap each JavaScript file in an AMD define() method call, that lists all file dependencies, and then use the Require.js optimizer, r.js, and Almond.js to build your library.
This means that you can internally use AMD to build your JavaScript library, while not forcing users to use AMD themselves.
Here is an example Require.js build profile (using Almond.js) to do just that:
1 2 3 4 5 6 7 8 9 10 11 12 13 14 15 16 | |
This works great, but unfortunately, Almond.js needs to be built into your library’s source file. Although Almond.js is a small library (~1kb gzipped and minified), it is not desirable for third-party code to be built inside of your own third-party library.
Recently, jQuery started wrapping all of it’s source files in AMD define() method calls. Instead of including an AMD shim, such as Almond.js, the jQuery team is using regular expression checks, at build time, to convert all define() method calls into local variables. This allows the jQuery team to use the benefits of AMD (e.g. dependency management) during development, while not having to include an AMD shim (such as Almond.js) after the jQuery production source file is built.
This is a great idea, but I am looking forward to someone (potentially me) creating a Grunt plugin that can generically reverse engineer an Almond.js project at build time and removes any AMD trace. When this happens, I believe the majority of JavaScript library authors will start incorporating AMD into their workflows.
How to Make jQuery Plugins Maintainable
Abstract boilerplate code
Make the codebase modular (even without Require.js)
Abstract jQuery Plugin Boilerplate
There are currently two open-source libraries that help abstract away common jQuery plugin boilerplate code; the jQueryUI Widget Factory and jqfactory.
jQueryUI Widget Factory
![]()
Provides a consistent foundation and API for building jQuery plugins
Supports widget inheritance using functions
Provides common helper methods
Let’s us create plugins using object literals
Can be used independently of jQueryUI
Example:
1 2 3 4 5 6 7 8 9 10 11 12 | |
jqfactory

Supports widget inheritance using object literals
Provides common helper methods
Supports jQuery prototype namespacing
Includes an elegant, promises-based, solution for asynchronous initializations
Easy event binding support similar to Backbone.js views
Example:
1 2 3 4 5 6 7 8 9 10 11 12 13 14 15 16 17 | |
Differences Between the jQueryUI Widget Factory and jqfactory
Namespacing
jqfactory supports jQuery prototype namespacing and the jQueryUI Widget Factory does not. This means that with jqfactory, you could create a multiple jQuery plugins under a single jQuery name (reducing the possibility of naming collisions).
Inheritance
jqfactory allows widgets to inherit from object literals when the jQueryUI Widget Factory supports inheritance using functions.
AMD support
jqfactory exports itself as a named AMD module (“jqfactory”) when the jQueryUI Widget Factory does not currently support AMD (although all jQueryUI files will soon be exported as anonymous AMD modules in a future release).
Event Handlers
jqfactory does not support passing event handlers as options when the jQueryUI Widget Factory does support event handler options.
Assumed Environment
jqfactory does not assume that you are using jQueryUI, when the jQueryUI Widget Factory does (e.g. Expects jQueryUI CSS class names).
Syntactic Sugar
jqfactory provides helpful abstractions in places the widget factory does not. Examples include event binding, jQuery deferred object support on intialization, and automatic event firing for certain actions (e.g. setting options)
Separate Our Plugin into Independent Pieces
From here on out, let’s assume we are using jqfactory to abstract away our jQuery plugin boilerplate code and are now ready to split up our plugin into separate files.
Our First jQuery Plugin File
Let’s assume that this file will be the first built file and will contain our default plugin options.
1 2 3 4 5 6 | |
On to the Next File
Let’s assume that this file will contain our plugin constructor function logic.
1 2 3 4 5 | |
Can You See the Pattern?
So far, we are creating a new file for each plugin method. The reality is that this is a bit overkill, so try to make logical modular design decisions. In other words, try to put methods/features that depend on each other in the same file. Since we are not using anything that handles dependency management (e.g. Require.js), we are forced to track dependencies ourselves.
Creating Our Plugin
Once we are done decoupling our plugin into different files, we can create our plugin using jqfactory.
1 2 3 4 | |
Building Our Plugin with Grunt

Since our plugin has been separated into multiple files, we need a command-line tool to build our plugin into one file (for a user to use). We also want users to be able to exclude certain files from the build to allow custom builds. This is where Grunt comes in.
What is Grunt?
 JavaScript (Node.js) Command-Line Task Runner
Perfect for automating repetitive tasks
A huge plugin ecosystem
Example Grunt Tasks?
File Concatenation
Minification
Code Quality Checking (e.g. jsHint)
Unit Testing and Phantom.js
SO MUCH MORE
How Do We Use It?
We need to create a file, called Gruntfile.js, at the root of our project directory.
Creating Our Gruntfile
Step 1
Inside of Gruntfile.js, we first need to wrap all of our Node.js code inside of a module.exports function.
1 2 3 4 | |
Step 2
Add the configurations for any Grunt plugins/custom tasks you would like to use inside of the initConfig() Grunt method and also call the loadNpmTasks Grunt method for each plugin. For this example, we are going to use the grunt-contrib-concat and grunt-wrap plugins.
Note: Any plugins that start with the grunt-contrib naming convention are Grunt plugins that are maintained by the core Grunt team. All other plugins are user plugins.
1 2 3 4 5 6 7 8 9 10 11 12 13 14 15 16 17 18 19 20 21 22 23 | |
Note: In the previous code example, you will notice that we had to call the loadNpmTasks() Grunt method for each Grunt plugin we were using. This can become annoying to do if you are using many Grunt plugins, so you may want to check out the load-grunt-tasks plugin, which allows you to load all Grunt plugins with one line of code.
Step 3
Create our very own customBuild custom Grunt task. Our custom task will work together with the other Grunt plugins we are already using (concat, wrap) to allow users to create custom builds of our jQuery plugin.
1 2 3 4 5 6 7 8 9 10 11 12 13 14 15 16 17 18 19 20 21 22 23 24 25 26 27 28 29 30 31 32 33 34 35 36 37 38 39 40 41 42 43 | |
Running Grunt
On the command line, type: grunt customBuild. This will build all of our plugin files into one file.
If you had wanted to exclude a file from the build (let’s assume there is an optional customMethod.js file), then you could type: grunt customBuild:customMethod
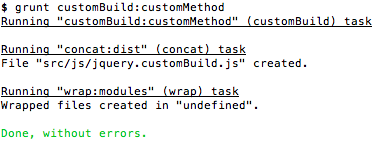
Success!
By default, any colon-separated arguments passed to our customBuild Grunt task will be mapped to plugin file names and will be not be included in our build.
Final Thoughts
JavaScript workflow tools are improving every day and will continue to improve. Start using these tools today!
Also, if you would like to learn how to create custom web UI builds for your users, then check out the rest of jQuery Portland Slide Deck that covers my open source library, DownloadBuilder.js
Happy jQuery plugin building!